Our cupolas are relatively easy to install, especially for people experienced in home renovation projects or your local handyman. They come is three easily assembled pieces: base, midsection, and roof. Before installing your cupola, you will need the following:Tape measure
- Square
- Pencil
- Screw gun with #2 square drive bit
- Circular and/or jig saw
- Level
- (2) 1” x 3” for an angle jig
- (4) pressure treated 2” x 4” mounting blocks
- (12) 3” deck screws or lags
- Flashing for the roof peak
- Silicone caulk and caulking gun
Preparing Your Roof
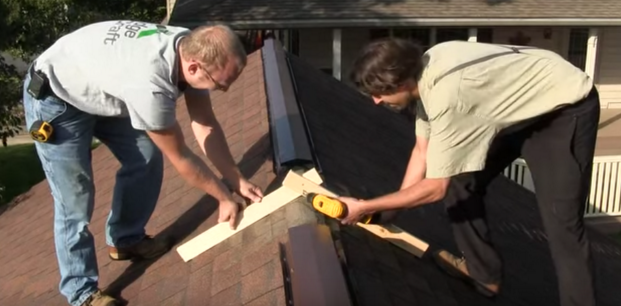
Next, screw together the 1” x 3” pieces to make an angle jig that you will use as a template for your cupola base. Put only one screw in at first so you can pivot the pieces. Put the boards firmly onto each side of the roof, then secure with a second screw, as shown below.
- Draw a center line on the cupola base on two opposite sides - these will become the angled cutouts for your roof.
- Line up the pivot point of the template with the center line and make sure the corners of the template meet with both bottom corners of the base.
- Trace a line along both inner sides of the template and repeat these steps for the opposite side.
- Cut the base with the circular or jig saw along the lines you’ve marked.
Once you have cut the angled sides, you will need to cut the base of the two solid sides to match. This ensures the cupola will fit snug against your roof.
Lastly, install a piece of flashing where the ridge vent or ridge cap was removed.
You are now ready to install the cupola base on your roof.
Installing the Cupola Base
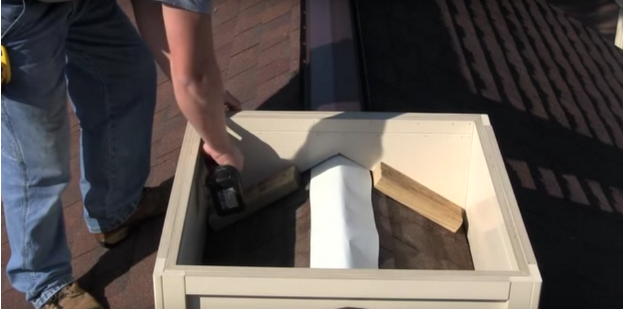
Cut 4 pressure-treated 2” x 4” blocks to be installed on the inside of the cupola base. (You may need to cut them according to the size of the cupola base.) Install them using 3” screws or lags as shown below.
Finally, use a clear silicone to caulk the base of the cupola.
Assemble the Cupola
Affordable, Quality Cupolas from Valley Forge Cupolas and Weathervanes
For quality and prices you can’t beat, call Valley Forge Cupolas at 1-866-400-1776.


 RSS Feed